 Here is an inspiring Illustrator tutorial that combines different techniques to create a really cool vector artwork.
It’s not as tricky as it sounds. The techniques involved in this tutorial are not complicate, and at the end of the article we will use Photoshop to give a final touch. It is interesting to see how a final illustration evolves through these steps. So, let’s get down to work!

Tutorial Details
- Program: Adobe Illustrator
- Difficulty: Beginner
- Estimated Completion Time: 30 Minutes
Step 1
Create a new document A4 size, now make a rectangular shape and fill the background in with a radial gradient with a light grey and white. Don't forget to lock the background layer.
Step 2
With a new layer draw four colored shapes going vertically like in the image below. Select all the squares, go to the brush tool and create a new brush. Select the brush type ‘New Art Brush’.
Step 3
On the layer press the eye icon so the squares aren’t viewable. Create a new layer and select the pen tool, begin by drawing a curvy line > Click on the brush tool and select the new brush you’ve just created.
Step 4
Now select the path you’ve just created, go to Object > Expand Appearances to convert the path to shape. Right click the shape and select Ungroup, you will now be able to select each colored line.
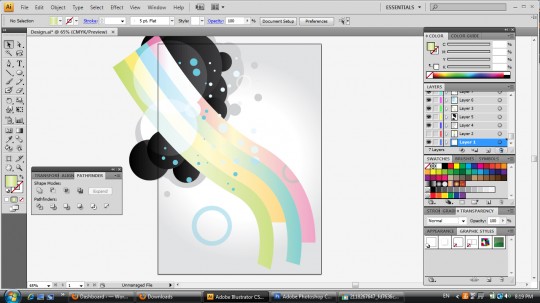
W we want to make each line different sizes, create a shape going over the line you want to crop, select the shape and the line and select Subtract from Shape Area in Pathfinder.
Note: To make pathfinder viewable go to Window > Pathfinder or select Shift+Ctrl+F9.
After you’ve done that select each line and create a gradient effect on each of them.
Step 5
I have decided to flip the lines over and move them to the left corner, if you would like to do this select all the lines, flip and move using the Selection Tool. Create a new layer to go underneath the lines, with a color of your choice create various sized circles with the circle tool.
Using the circle tool I have created various circles, I have added a gradient to some, made some different colors and put a Hard Light & Overlay Blending Mode. With the see through circle I created 2 circle sizes, with the smaller sized circle in front of the larger size, I selected them both and clicked on exclude in Pathfinder.
The Result

Optional Photoshop Steps
Save the document and exit Illustrator. Start up Photoshop and open the illustrator document. Choose a large sized texture you think will look good, I’ve chosen then paper texture.
Copy and paste the texture ontop of the design layer. I’ve made the paper texture black and white by going into Image > Adjustments > Desaturate. I’ve made the layer blending options hard light and opacity 13%. You can experiment with what blending mode works best for you.
Now choose your layer, and go to Layer > New Adjustment Layer > Vibrance. In the New Layer dialog box, type a name for the Vibrance adjustment layer and click OK. Use the settings from the image below:

Let’s add some Leather Texture, I’ve prepared for you a large, clean and high resolution leather pattern.
Set the Blend Mode to Overlay, you should have something like this:

Download this paper texture and put it on top of all layers, set the Blend Mode to Linear Burn and the Opacity to 50%. You should have something like this:

Conclusion
Here is your finished image! You can use the same base image and experiment with different techniques in Photoshop. Enjoy!












Comments