In this Photoshop tutorial i will show you creative process of applying some cool liquid and smoke effects to both typography and images, with some pretty awesome techniques. This tutorial presented you how to start with cut and paste a lady and produce the nice background. You'll also discover how to combine 3D renders with Photoshop's Displace filter to produce those stunning "break away" effects that are currently in vogue. In addition, you can add some other objects to emphasize, then your artwork are done. You’ll also learn many different ways of color adjustments to get the exact images you’ve always wished. This is a comprehensive tutorial that weighs in at almost one hundred steps, so let's get started!
Tutorial Details
- Program: Adobe Photoshop CS2+, Adobe Illustrator CS2+, Maxon Cinema 4D R8+
- Difficulty: Advanced
- Estimated Completion Time: 4 - 5 Hours
Final Image Preview
Let's take a look at the image we'll be creating.

Resources
You'll find some files in this "resources.zip" archive. You'll also need the following stock photography to complete this tutorial.
- Paper textures
- Cracked earth by Mike Smith
- Paint splashes
- The large version of this fashion model
- Liquid inks
- Sky
- The small version of this Bonsai tree
- Spheres
- The standard version of this Parrot
- Butterfly
- Ladybird
Step 1
Create a new portrait document 2008 px x 2835 px in RGB Mode with the Background Content set to White. Add "stainedpaper3.jpg" from these textures, then hit Command + T and enlarge to cover the canvas.
Name the layer "Grunge 1" and place into a group folder called "BACKGROUND" Next, set the Clone Tool (S) to Current Layer and use a small, soft-edged brush to remove the hard crease as indicated.

Step 2
Place "stainedpaper8.jpg" within the folder, enlarge and label it "Grunge 2". Hit Shift + Command + U to Desaturate, then change its Blend Mode to Hard Light and lower the Opacity to 23%.

Step 3
Add "stainedpaper5.jpg" as a final texture layer, enlarge and name it "Grunge 3". Desaturate and change its Blend Mode to Overlay, but leave the Opacity as default.

Step 4
Set your Foreground color to #939598 (50% black), then add a mask to the "BACKGROUND" folder. Hold down Shift and drag a Linear Gradient from the bottom up using the Foreground to Transparent preset.

Step 5
Add the "All Cracked Up.jpg" as a new layer above the "BACKGROUND" folder and name it "Cracked earth". Desaturate, then squash vertically as shown.

Step 6
Press Command + T, then Control-click to select Perspective. Now pull the top right control point towards the centre.

Step 7
Set the "Cracked earth" Blend Mode to Multiply and reduce the Opacity to 71%. Add a mask and grab a large, soft-edged brush to gently blend the hard edges into the background.
Note: You'll achieve a better result by initially working at low Opacity, then finish off at full strength.

Step 8
Next, we'll modify the color value of this layer; hold down Option and choose Photo Filter from the Create new fill or adjustment layer drop-down menu situated at the foot of the Layers tab. In the following window check the Clipping Mask button, then pick Warming Filter (81) from the drop-down menu and set the Density to 55%.

Step 9
Grab the Type Tool (T) and add the words "go" and "CREATE" in black on separate layers. I used a serif font (Century Schoolbook). Keep your type at around 100 pt and centred using the Paragraph tab, then position to the bottom half of your canvas. Next, place your type cursor between any character pairs to fine-tune the kerning. You'll see that I've tightened up the spacing between the "A" and the 't" by eye for a pleasing result.
It's worth remembering that kerning adjusts the space between character pairs and should not be confused with tracking, which adjusts spacing between whole words.

Step 10
Open "15.jpg" from these paint splashes. Set the Magic Wand Tool (W) to a Tolerance of 55 and check the Contiguous button. Now click anywhere on the white background to generate a selection and hit Shift + Command + I to Inverse it. Next, go to Select > Modify > Contract by 1 px. Hit Command + J to Copy the selection to a new layer and trash the original layer.

Step 11
Desaturate, then hit Command + L to access the Levels dialogue box and set the Input and Output sliders as below. Now apply a Save As command to a handy location.

Step 12
Use the same workflow to isolate some other splashes - I used "4.jpg", "8.jpg" and "9.jpg".
Note: Because every image is different you'll need to adjust the Magic Wand's Tolerance and tweak your Levels settings accordingly.
When you're done apply the Save As command again.

Step 13
Highlight your first text layer thumbnail, then Shift-click to highlight the second one. Hit Command + E to Merge Layers, rename the resulting layer "text" and drop its Opacity to 20%. Place this layer into a new group folder called "TEXT". This layer will act as a guide to position the splashes.
Use the Lasso Tool (L) to select a portion from your first paint splash and Copy > Paste as a new layer within the "TEXT" folder. Transform, rotate and position over the "C". We'll eventually use areas of the template as black - so don't sweat over following the letter form precisely.

Step 14
Lasso another paint segment and Copy > Paste as another layer. Now use the Transform's Warp function to roughly conform it to the letter form.

Step 15
Duplicate the layer twice, resize, flip and Warp again to form the "o".

Step 16
Add segments from your other paint splash images on separate layers to gradually assemble the remaining characters.

Step 17
When you're done, Merge your paint splash layers and name it "Paint splashes". Now set your "text" layer back to 100% Opacity and Command-click its layer thumbnail to generate a selection and Inverse. Now use a medium, hard-edged Eraser (E) to remove selective paint overlaps, then deselect.

Step 18
Add a mask to your "text" layer, then hide areas using a small, hard-edged brush. When you've finished your text should look something like this.

Step 19
Now we need to accurately isolate the model's upper body from the background; Photoshop has many tools to achieve this, but in this instance we'll use a combination of paths and a channel mask. Set the Pen Tool (P) to Paths, zoom in and draw a closed path around the figure. Don't sweat over the hair - plot your points just inside and around her ear as shown in red.
Remember, you can modify paths at any time - just press Command to access the Direct Selection Tool (A) and fine-tune individual direction/anchor points as required.

Step 20
Next, check the Subtract option to create the two inner sub paths as indicated in red - remember to draw just inside of the hair. When you're done, save your "Work Path" by double-clicking its thumbnail - this also avoids it from being over written.

Step 21
Now we'll mask the hair by means of a density or channel mask. Switch to your Channels tab and cycle through each channel in turn to determine which holds the most contrast - in this instance it's the Green channel.
Drag its thumbnail over the Create new channel icon at the foot of the palette to duplicate it. Now adjust the Input Level sliders as below.
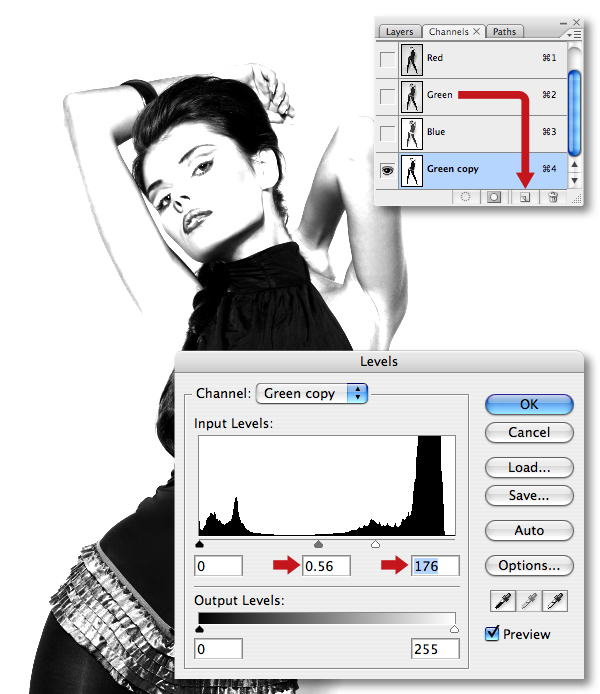
Step 22
By default, it's the white channel areas that act as selections - so press Command + I to Invert and make the channel negative.

Step 23
Switch to your Paths tab and Command-click your path thumbnail to create a selection. Set you're Foreground color to black, then switch back to your Channels tab. Ensure the duplicate channel is highlighted, then hit Delete to fill the selection with white.

Step 24
Inverse the selection and use a large, hard-edged brush to fill the bottom half of the channel with black.

Step 25
Zoom in and carefully use the Dodge Tool (0) set to highlights to remove any areas where the hair meets the hard edge of her neck and head.

Step 26
Command-click your channel thumbnail to generate a selection, then target the top RGB composite channel. Switch back to your Layers tab, copy to a new layer and name it "Girl isolated". Now disable the visibility of the original layer to view the model in isolation.

Step 27
Drag the "Girl isolated" thumbnail into your working file and place it within a new group folder called "MODEL" below your "TEXT" folder. Resize and position slightly off centre as shown.

Step 28
Next, we need to desaturate the model's dress; first, clip a Black & White adjustment layer to the "Girl isolated" and choose the Maximum Black preset.

Step 29
Now we need to restrict the Black & White adjustment to the dress, so draw a closed path as indicated in red. Generate a path-based selection, Inverse, target your adjustment mask and fill with black.

Step 30
Add "9.jpg" (from Step 12) as a new layer at the top of the stack within the "MODEL" folder. Label it "Dress paint 1", then Transform/rotate and place as shown. Now use the Burn Tool (O) set to Midtones to merge the lighter areas into the dress.

Step 31
Open "7.jpg" from the paint splash folder. Instead of using the Magic Wand, we'll use the Color Range extraction method; go to Select > Color Range, click on the background, then set the Fuzziness Slider to 135 and check the Invert button.
Next, copy the selection to a new layer, trash the base layer and apply a Levels adjustment to darken the image as before.

Step 32
Add as a new layer at the top of the stack within the "MODEL" folder, Transform/position over the model's dress and extend into the lettering. Use the same selection techniques to add two more paint layers.
When you're done, add masks to blend any hard edges into the dress, then use the Burn Tool (O) as well. Name these layers "Dress paint 1", "Dress paint 2" and "Dress paint 3".

Step 33
Add "1119.jpg" from these liquid Ink images as a new layer above "Dress paint 3". Rotate 180 degrees, Flip Horizontal and label it "smoke". Next, set the Blend Mode to Darken, resize and position so it flows up from the lettering and into the model's dress. Finally, add a mask to hide areas as required.

Step 34
Next, we'll add some skin colored splashes around the model. Open and extract "18.jpg" using the Magic Wand. Now apply the Save As command.

Step 35
Add as a new layer at the top of the stack within the "MODEL" folder and Transform/position over her right arm. Add a mask, then use a selection from the "Girl isolated" layer to hide the main shape of her arm. Next, clip a Hue/Saturation adjustment, check the Colorize button and copy these settings.

Step 36
Now clip a Color Balance adjustment layer and copy these settings.

Step 37
Finally, clip a Levels adjustment and use the setting below. Your paint splash should now match the model's skin tone. At this point it's a good idea to save all three adjustment settings - to do this, double-click each one in turn and save to a convenient location.

Step 38
Shift-click all three adjustment thumbnails as well as your original paint splash thumbnail, Merge, then rename the resulting layer "skin paint 1". You'll notice that the Merge command automatically applies the mask and the adjustment layers to keep the file size manageable.

Step 39
Add your isolated splash (from Step 34) as several new layers, then mask and clip the same three adjustments (Steps 35, 36 and 37). From here you can click the Load button to access your saved settings (from Step 37). When your happy, Merge each layer and its relevant adjustments as before, then rename them "skin paint 2" etc.

Step 40
Open the sky image and choose Image > Rotate Canvas > Flip Horizontal. Now select the top portion using the Rectangular Marquee (M) Tool and Copy.

Step 41
Paste below the "MODEL" folder and name it "Sky". Enlarge to cover your canvas, then stretch vertically. For a subtle effect, change the Blend Mode to Luminosity and lower the Opacity to 30%.
Next, add a mask, set your Foreground color to black and Shift-drag a Linear Gradient (G) from the bottom up using the Foreground to Transparent preset.

Step 42
Add a new group folder called "WHITE SMOKE" below the "MODEL". Open "Liquid_Ink_V1_1096" from the "Liquid Ink 001" folder, Flip Horizontal, then hit Command + I to Invert. Place into your new folder, Transform/position above the model's head and name it "Smoke 1".
Next, change the Blend Mode to Screen and reduce the Opacity to 68%. Now double-click its layer thumbnail to access the advanced blending dialogue box. Hold down Option and click the top right Blend If slider (to split it) and pull left.

Step 43
Open "Liquid_Ink_V1_1126.jpg", Invert, add as a new layer and label it "Smoke 2". Position middle left, then split the top right Blend If slider as shown. This layer should also be set to screen, but leave its Opacity at full strength.
Invert "Liquid_Ink_V1_1128.jpg" and add as another layer, name it "Smoke 3", then Transform/position top right. This layer should also be set to screen at 100% Opacity. Now split the top left Blend If slider as shown. Finally, duplicate this layer, rotate and position top right and extend it beyond your canvas. Rename this layer "Smoke 4".

Step 44
Add a mask to the "WHITE SMOKE" folder and use a large, soft-edged brush to reveal the top left underlying clouds.

Step 45
Open the bonsai tree and apply a Colour Range selection - don't sweat over getting an accurate selection around the pot - this will be erased in the next step.

Step 46
Copy > Paste the selection as a new layer above the "WHITE SMOKE" folder. Rotate slightly clock-wise, then Transform/position behind the model's waist. Name this layer "Tree", add a mask and use a large, hard-edged brush to remove the trunk and pot.

Step 47
Next, clip a Color Balance adjustment to the "Tree" layer and copy these settings.

Step 48
Now we'll draw some shapes which we'll add some interest to the background; launch Illustrator and create a new A4 portrait document. Go to Illustrator > Preferences > Guides & Grid and enter 10 mm in the Gridline and 2 in the Subdivision fields. Now select Show Grid and Snap to Grid from the View menu.
Note. If you want to skip this creation process, jump to Step 55 and open "lines.ai" from the 'source" folder.

Step 49
Grab the Ellipse Tool (L) and snap a circle (Fill: none / Stroke: 1 pt) to your grid.

Step 50
Grab the Scissor Tool (S) and cut the two middle points, then delete the top half of the circle. Now select the Pen Tool (P) and click on the left point to extend upwards.

Step 51
Use the same technique to build up more shapes. You can also save time by duplicating, flipping, resizing and rotating groups of paths.

Step 52
Draw a circle (Fill: none / Stroke: 1 pt), then draw a path longer than the circle's circumference above it. Select the line, then hold Option + Shift and drag it below the circle to duplicate it.
Select both lines, then double-click the Blend Tool (W), in the next window select Specified Steps from the Spacing drop-down menu and enter 35 (you may need to use a different amount, depending on the size of your circle). Now click both lines to apply the blend.
Note: Blends remains live until they're Expanded - to edit, simply select the object and double-click the Blend Tool in the toolbar.
Also, here's a comprehensive guide to Illustrator's Blend Tool.

Step 53
When you're done, select the object and choose Expand from the Object menu, then Group all the horizontal lines. Select both objects and click the Horizontal and Vertical Align Centre buttons in the Align tab. Now select the lines and Shift-rotate 45 degrees. Finally, select both objects and click the Divide button in the Pathfinder tab.

Step 54
Place, resize and duplicate the circle to complete your line work. You can now disable the Snap to Grid option and reposition paths as required. At this point I decided to make the line weights thinner - I used a combination of 0.7 and 0.8 pt.
Note: To do this quickly, select a single line, then go to Select > Same > Stroke Weight.

Step 55
Select All, change the Stroke to white and Copy. Switch to your project file and add a new folder called "GRAPHICS 1" below the "MODEL". Paste within the new folder, selecting Pixels in the next window. Name the layer "Lines 1", then Flip Horizontal and position as shown. Now set the Blend Mode to Overlay, then add a mask and use a large, soft-edged brush at a low Opacity to hide sections as required.

Step 56
Paste as another layer and label it "Lines 2", position top left and apply the same Blend Mode. Add a mask to hide areas, load the "tree" layer as a selection and fill with black on both masks. Finally, reduce the Opacity of both these layers to 90%.

Step 57
Create a new Illustrator document, grab the Type Tool (T) and add the letters "a" and "+" in pale gray. I used Century Schoolbook and Impact at around 220 pt.
Note. If you want to skip this part, jump to Step 60 and open 'type.ai" from the 'source" folder.

Step 58
Select both characters and hit Shift + Command O to Create Outlines.

Step 59
Now select your first path and go to Effect > 3D > Extrude & Bevel and copy these settings.

Step 60
Next, apply a different Extrude & Bevel to your second character as shown.

Step 61
Copy > Paste both objects as pixels on separate layers within the "GRAPHICS 1" folder and label them "A character" and "Plus sign". Flip the "Plus sign" horizontally and resize, rotate both objects as shown.

Step 62
Apply a Levels adjustment to both layers, then change their Blend Modes to Luminosity.

Step 63
Next, we'll incorporate some 3D spheres; add "001.png" and "007.png" from these spheres. These are fairly large files, so they'll need reducing in size. Place them at the top of the stack within the "GRAPHICS 1" folder and label them "Sphere 1" and "Sphere 2".

Step 64
Add another folder above the "TEXT" and label it "GRAPHICS 2". Place a smaller sphere ("010.png") over the model's dress and name it "Sphere 3".

Step 65
Open the parrot, then use the Magic Wand (W) to Copy an inversed selection to a new layer and delete the original layer.

Step 66
We now need to enlarge the canvas to allow for the paint "branch". Switch to Full Screen mode, Grab the Crop Tool (C), snap it to your canvas border and extend. Lasso a selection from your paint splash used in Step 11 and Copy > Paste as a new layer. Rotate and Transform, then use the Transform's Warp function to modify its shape to form the "branch".

Step 67
Transpose the stacking order of the layers, then plot a series of closed paths as indicated in red.

Step 68
Target the upper layer, make a path-based selection and hit Delete. Now create a layer-based selection from your base layer and erase the parrot's tail.

Step 69
Merge both layers and place within a new group folder called "ELEMENTS" at the top of the layer stack. Flip horizontal, resize/position as shown and label it "Parrot".

Step 70
Next, use the Color Range extraction technique on the butterfly.

Step 71
Copy the selection to a new layer and delete the original. Now use a large, hard-edged eraser to remove the flower, then a smaller brush to remove any remaining foliage around the creature's legs.

Step 72
Add as a top layer within the "ELEMENTS" folder and name it "Butterfly". Now flip horizontal, resize and place over the lettering as below.

Step 73
Import "Turf.png" from the "source" folder as a top layer within the "ELEMENTS" folder. Position over the cracked earth and label it"Turf". Generate a layer based selection, add a new layer below it and fill with black. Label this layer "Turf shadow", then squash vertically.

Step 74
Choose Filter > Blur > Gaussian Blur and enter 2.0 px.

Step 75
Erase the top of the shadow with a large, soft edged brush, then change the Blend Mode to Multiply and lower the Opacity to 55%.

Step 76
Add the "leaves.png" from the 'source" folder and use the same technique to place some shadows.

Step 77
Next, we'll add the ladybird. This image has a complex background, so you'll need to use the Pen Tool (P) to isolate the insect. Copy > Paste into the "ELEMENTS" folder, flip, rotate and place on the grass. Adjust the Levels as required, then add a shadow.

Step 78
Now we'll create some explosion effects, which we'll use in conjunction with the Displace filter to break up parts of the composition.
I've used Cinema 4D, but the same effect can be recreated in most 3D apps. Also, my version of Cinema 4D is pretty ancient, but you can get the same results using the newer versions. Create a new document and add a sphere primitive. Drop an Explosion object into the Sphere and Copy the settings in the Object Property fields. Don't worry about lighting etc. - we're only interested in the object's shape as you'll discover in the next step.
Note. If you want to skip this part, jump to Step 81 and use "explosion_1.jpg" and "explosion_2.jpg" from the 'source" folder.

Step 79
Go to Render > Render Settings and use the following. Next, hit Shift + R to Render to Picture Viewer.

Step 80
For variety drop a Wind deformer into the Sphere and copy these settings. Now perform another render, but ensure you don't overwrite your initial render.

Step 81
Open your first render; load the extra channel as a selection and Copy. Add a new channel to your project file and Paste the selection. Enable the visibility of the top RGB composite channel. Now resize and position the selection over the parrot's wing.

Step 82
Paste the selection again and resize/position over the right sphere. Now use a selection from your second render over the remaining spheres and butterfly.

Step 83
Now highlight the top RGB composite channel, switch to the Layers tab and load a layer-based selection from the butterfly. Back in the Channels tab, ensure the extra channel is highlighted and fill the selection with black.
Repeat this process using selections from your "Sphere 1", "Sphere 2", "Sphere 3" and the "Butterfly" layers.
We now need to ensure there's no pixel information extending beyond the canvas - this is vital for the Displace filter to work correctly. To do this, Select All, then choose Image > Crop.
Next, choose Duplicate Channel from the fly-out menu, then in the next window select New as its Destination and give it a memorable name. The channel will now appear as a new document which should be saved to a convenient location. This channel will later be used in conjunction with the Displace filter to break away selective areas of the illustration.

Step 84
Disable the visibility of all layers except for the "Parrot", "Sphere 1", "Sphere 2", "Sphere 3" and the "Butterfly". Add an empty layer at the top of the stack and name it "Fragments". Now choose Image > Apply Image and hit OK in the next window - this command creates a composite layer from the visible layers.

Step 85
We'll be applying the Displace filter twice, so duplicate this layer and turn off its visibility. Ensure your original "Fragments" layer is active, then go to Filter > Distort > Displace, use the settings as below and click OK.
The next window will prompt you to locate/select the file you saved from Step 83. When the filter has been applied your image should look something like this.

Step 86
Enable the visibility of all layers/folders, except the "Fragments copy". Add a mask to your "Fragments" layer. Create a layer-based selection from the "Parrot" layer and use a medium, hard-edged brush to hide areas as required. Now Invert the selection and continue painting on the mask.

Step 87
Open the displacement file you saved from Step 83 and hit Command + I to Invert then Save. Next, delete both your "Sphere 1" and "Sphere 2" layers, then switch off the visibility of the "Fragments" layer for clarity.
Target the "Fragments copy" layer and press Command + Option + F to access the last filter. Enter these settings and load your inverted displace file.

Step 88
Add a mask to the "Fragments copy" layer and hide areas as you did before - both my masks are shown at the bottom of the screen grab.
You can now use the Lasso Tool (L) to drag selections around elements (such as the spheres) and reposition them using the Move Tool.

Step 89
If your fragment layers to show any edge halos, choose Layer > Defringe and enter 2-3 px. You're image should now look something like this.

Step 90
At this point, I decided to use the same "break away" technique to the model's head. Add a new channel and follow the same workflow as Step 81. Now use the Transform's Warp function to distort the selection as below.

Step 91
Repeat Step 83 to duplicate the second channel as a new file and Save. Next, disable the visibility of all layers except the "MODEL" folder, add an empty layer at the top of the stack, repeat the Apply Image Command and name it "Girl Fragments".
Now use the Displace Filter again, copy these settings and load the file you saved at the beginning of this step.

Step 92
Defringe the layer if required, then add a mask. First, paint within a selection from the "Girl isolated" layer, deselect, then continue to hide areas.

Step 93
Grab the Burn Tool (O) to darken areas on the fragment layers. Finally, place all your fragment layers into a new group folder called "FRAGMENTS" and you're done!

Conclusion and Scope
I hope you've enjoyed this tutorial and discovered some new approaches to working along the way. Why not experiment and expand on these techniques and apply them to your own compositions!