In this Photoshop tutorial, we will demonstrate how to create a colorful retro-modern composition using the Pen Tool. For this tutorial you need basic Photoshop knowledgeable, as we will work with basic Photoshop tools, like burn tool, brushes, filters and others. Photoshop techniques that you’ll learn in this tutorial, you can use in creation of advertising posters or creating your own stylish photo effect. As you can see from the preview, with the basic knowledge and a little effort, we will be able to create a stunning effect. I hope you will learn some new tricks. So, let’s move forward and start this tutorial.
Tutorial Details
- Program: Adobe Photoshop
- Difficulty: Intermediate
- Estimated Completion Time: 10 - 12 Hours

Tutorial Assets
The following assets were used during the production of this tutorial.
Step 1
Create a new document using the following dimensions 2500x1500 and also use 300dpi for the resolution. It is best to do this because in time you might want to print the composition and saving it at a high resolution is a must.

Step 2
It does not matter what color you fill your document as you will start adding colors straight away. Using the Pen Tool (P) set to create full shapes you will need to create a few shapes like in the image below. Define these shapes using the colors #ff9c00 for the top part, #00d2ff for the lower right side, #ad08f6 for the lower middle part and #e50000 for the lower left part.

Step 3
Add a soft orange gradient to the above part using the Blending Options setting. You can activate the Blending Options option by double clicking on the layer. When the Blending Options window opens access the Gradient Overlay option and Normal gradient using the colors as in the image below #ff1e00, #ffde00, #ffde00.

Step 4
Duplicate the top Orange layer than using the transform option by pressing Command/Ctrl + T resize the shape a little pulling the lower right corner inwards just a few inches. This is just to create start creating some depth to the shapes.

Step 5
Using Command/Ctrl + Click on the first orange layer you will make a selection of the layer. Than create 2 new layers and using a Black Soft Brush of different sizes start brushing on the edges of the selection and set the layers to Overlay 28% and 12%.

Step 6
Start creating 2 new white shapes using the Pen Tool (P) and place them over the duplicated orange layer. Set the 2 new layers to Overlay 50% and 25%.

Step 7
Create another shape like in the image below again using the Pen Tool (P). Also keep in mind that each shape you create needs to be placed into a new layer so that you have total control over it. This shape is created just so that you can create a few lights so do not worry about the color.

Step 8
Hold down Command/Ctrl and press on the layer to make a selection of it than you can make the layer invisible but keep the selection active. Create a new layer and set it to Soft Light. Using a Soft Brush set to white you need to brush on the edges of the selection. This technique will help you achieve more abstract shapes and the effect you are looking for.

Step 9
Keep repeating the last 3 steps and continue creating similar abstract shapes until you achieve the same result as the one in the image below. A bit different than the other 3 steps above you can also add a few white elements set to Soft Light on the edges of the shapes you just created. Look for adding a shinny effect.

Step 10
Continue adding strokes on the edges of the Orange shape using the Pen Tool (P). First set the Brush to white, 2px size. Chose Shape Dynamics, Size Jitter 0% and control to Pen Pressure. Set the Pen Tool to just path than create short paths on the edges of the shape like in the image below than Right Click and chose Stroke Path. Make sure the brush is selected and Simulate Pressure checked. Again these strokes will be created in separate layers and set to Soft Light and 35%, 24%. Experiment with the settings.

Step 11
Create a small circle on the orange area using the Elliptical Marquee Tool (M) than access the Blending Options and add a Gradient Overlay. Set a Gradient using the colors #ff6f00 and #ffea00.

Step 12
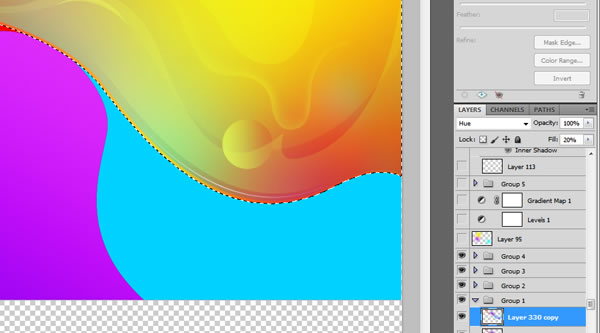
Select the duplicate layer of the orange shape and before you start adding the colors you need to create a new layer and set it to Hue and 60%. Now using a soft brush you will need to start adding some color into the orange shape. If you start adding color to the lower right side of the orange shape than you will need to use the same blue shade as the color next to it and repeat this for the rest of the shape.

Step 13
Duplicate the layer after you finish adding the soft colors and set the layer to hue and 20% fill.
Step 14
You have finished working on the Orange part of the composition for not. It is time to start working on the blue area and as you did with the Orange part you will also repeat the steps for the Blue one.
Add a soft shadow inside the shape. The shadow will be added using Blending Options > Inner Shadow.

Step 15
Start adding soft shades of white over the blue area just as you did with the Orange part.

Step 16
Use the soft Brush with colors from the composition to add some extra color over the blue area just as you did in the early steps. Also using the Pen Tool (P) create shapes using the white color just as in the image below.

Step 17
The blue area should be ok for now. Start working on the Purple area next and again use the same technique as above. You need to feel free to experiment and play with the shapes until you achieve a result that makes you happy.

Step 18
Add a bigger white glow on top of the Purple area using the Pent Tool (P) as seen in the image below. Than continue by adding the glow elements and color reflections. Follow the image below for reference.

Step 19
Lastly continue by working on the Red area and again use the same techniques. At the end of all this editing the composition will take a form of some sort of candy composition. Everything needs to be colorful and almost tasty.

Step 20
Using a large Soft Brush you need to add 3 spots of color using Blue, Purple and Yellow. Areas where to place these spots are marked on the image below. Color codes: #f3eb16, #c9ee22 and #02fcff. Set the layers of these spots to Soft Light 50%.

Step 21
Create a Levels layer using the following Settings: RGB - 0 , 1.00 , 255; RED - 0 , 0.75 , 255; Green - 0 , 0.87 , 255; 0 , 1.24 , 255. Lastly Create a Gradient Map from black to white and set it to Luminosity. Place these 2 layers above all other layers created so far so that the image will be affected by these effects.

Step 22
Create a Blue circle using the Elliptical Marquee Tool (M) #00ccff.

Step 23
Access Blending Options for the layer you just created the circle and add Inner Shadow setting the color to Black and the option Multiply. Opacity 26%, Angle 39, Distance 4, Choke 0, Size 174.

Step 24
Make a selection around the circle than using a soft black Brush you need to add 3 spots of shadow on different layer each than set them to Normal 49% and the other ones to Multiply set to 13% and 24%.

Step 25
Again make a selection around the circle but this time you will add a white layer to create the effect of glow and light. Set the layer to Overlay.

Step 26
With the help of the Gradient Tool (G) you need to create a gradient set to White - Transparent.

Step 27
Create a new shape like in the image below (a drop of water in this case a drop of light) and fill the selection with white than set the layer to Soft Light and 20%, than duplicate the layer, reverse it using the Free Transform option and change the fill to 10%.

Step 28
Make another selection around the circle than using the Brush Tool (B) you will need to add colors to the sphere. The colors that you add will be the ones from the area near the edges of the sphere. Please take a look at the image below for reference. Set the layer to Hue and 56% fill.

Step 29
Create another white shape over the sphere than set the layer to Soft Light and play with the Fill settings.

Step 30
To intensify the colors on the sphere a bit more you need to create a Vibrance Adjustment from the layer palette. Set it to Vibrance 85% and the saturation to 0. To have this effect show only over the sphere you will need to create a mask by selecting the circle and pressing the mask button.

Step 31
Make sure to place all the sphere layers inside a folder to keep everything organized. Duplicate the sphere with all the layers. Enlarge the sphere by pressing Command/Ctrl + T and hold down Alt + Shift than you can rasterize the layer. Use the Brush Tool (B) set to Orange and Red to add a few lights over the sphere than in the end set the duplicate sphere layer to 52%. This effect will give the sphere a really interesting effect of some sort of a atmosphere around it.

Step 32
Create 2 more gradients over the sphere just like in Step 26. They need to be White and Yellow and set the Fill to 50%.

Step 33
Create a blurred shadow below the Sphere using the Elliptical Marquee Tool (M). Set the layer to Multiply and the Fill to 70%. Set the radius of the Blur to 30%.

Step 34
This first sphere has been finished although you will need to create a few more similar sphere and to do this you will need to repeat the previous steps to recreate them. Start off by creating a smaller Yellow circle on the lower right and continue by adding the necessary effects to achieve the same result as in the images below.

Step 35
Continue with the creation of the Red sphere on the lower left side of the composition and continue with the same technique.

Step 36
Add another purple sphere over the first main sphere and again start adding the same settings and effects to it.

Step 37
Using the Pen Tool (P) you will need to create soft strokes like in the image below using the following colors #c700ff, #ff3800, #00e3ff and #fff100.

Step 38
Create a few white circles of different sizes around the composition than set each layer to Soft Light.

Step 39
Using the Pen Tool (P) you need to create a few black shapes like in the image below. Note that these shapes have been created in the area where each color connected.

Step 40
Create a white soft light effect placed over the small circle on the top right corner. This will give the impression of a light source that will be later shining over the spheres and other elements. Set the soft white brush layers to Soft Light and Overlay. Also add a black gradient set to Multiply mostly over the lower side of the composition.

Step 41
The composition is looking pretty interesting as it is right now although we want to take this to a whole new level and add into the composition a beautiful portrait of a woman. The portrait I chose here is perfect for our idea and the fact that her hair is done that way it will help us combine the sphere techniques used so far and get the portrait to look as close to the background.
Start by cutting the image of the girl and placing her in your document. Make sure you flip her so that she is facing the left side.

Step 42
Duplicate the image than go to Image > Adjustments > Posterize and apply level 4. The reason you are applying this effect is only to make it easier on yourself. This effect will determine where each shadow, light and stroke needs to be placed in order to create the vexel effect.

Step 43
To make it visible I lowered the opacity of the portrait down a bit. Now you will start filling the darker areas with Red #c50000 like in the image below.

Step 44
The greener area will be stylized with Blue #00aacb like in the image below.

Step 45
The rest of the colors fill with Yellow.

Step 46
Set the shape to Fill 0%. Than set the Blending Options to Gradient Overlay than chose Opacity to 66% with the Angle set to 29 degrease and scale to 150%.

Step 47
Now it is time to add some details to the shapes. Make a selection like in the image below than fill the layer with white, set it to Soft Light and Fill 50%. You will repeat this process for all the other shade gradations noticeable on her face and arm. For the arm use Soft Light and 46%.

Step 48
For the smaller area selection create a new layer and set it to Fill 0% than in Blending Option chose Gradient Overlay than apply a black to white gradient using the settings below.

Step 49
Add a few white layers over the model using the same technique used at the very beginning of the composition.

Step 50
Trace a few white strokes just as you did in steps 9 and 10. Add these strokes at the edges of the white glows.

Step 51
Create a few shadows and lights over the Blue area just as you did on the spheres. Look at the images below fore reference.

Step 52
Add more shadows and lights over the Red area now just as you did with the Blue are.

Step 53
Now it is time to start working on the eyes of the girl. The eyes will also be vexelized. Trace the eyes using the Pen Tool than fill the selection with white into a new layer.

Step 54
Create 2 Blue #00f0ff circles over the eyes area than go to Blending Options for each layer you created the circle and add Inner Shadow wit the settings below. Than create a mask to hide the circles to only be visible on the white area of the eyes.

Step 55
Create 2 more circles but this time make them Black. Again hide the extra areas using the mask and than use a White soft brush to add some glow over the Black circles.

Step 56
Using the Pen Tool again you will need to start creating more detail into the eye. Add gloss simply by creating a white shape and setting it to Soft Light. Continue adding these white layers over the eye until you result in something similar to the image below.

Step 57
Create the tear duct by making a selection of that area and after you fill a new layer with white you need to apply se following Blending Options.

Step 58
Continue adding more detail to the eyes by creating the eyebrows, eyelids and a few more black strokes that will bring the eyes to life.

Step 59
Make a selection around the Yellow layer around the girl than create a new layer and using a soft brush with colors from the neighbor areas and add soft colors over the new layer. Set the layer to Soft Light and 15% Fill.

Step 60
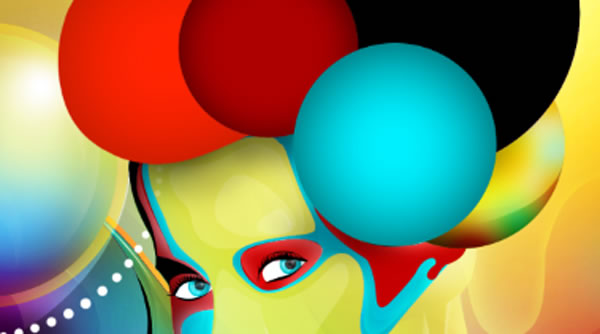
Create 6 new spheres on top of the girl's head. Fill these with the colors specified in the image below than apply s Inner Shadow and a drop shadow like below.

Step 61
Now that the main shapes of the spheres have been created it is time to start adding details to them. Begin with the Yellow sphere on the right side of the girl's head. Add some glow over it using white layers set to Soft Light.

Step 62
Use the soft brush and after you create a new layer you need to start adding come colors to the sphere. Use the blue, red, green and white layers to add soft spots of color. Than set the layer to Color and Fill 53%.
Step 63
Make a few selection like in the image below using the Pen Tool. Fill these selection with white than set the layer you created these stripes to Soft Light and Fill to 9%.

Step 64
Now that you worked and finished the Yellow sphere you need to continue working on the Blue sphere on the upper side. Start by adding the Inner Shadow to the Blue sphere.

Step 65
Create the light effects just as you did with the Yellow sphere.

Step 66
Create a new layer with white over the sphere and add the following Blending Options.

Step 67
The Blue sphere is now over so continue working on the Orange one. Use the same techniques as before and add the gloss effects to the Orange sphere. Look at the images below for reference.

Now apply the gloss effect using the Blending Options effect used for the previous spheres.

Step 68
Next is the Red sphere that you need to create the effects to it. Again please use the same techniques to create it.

Now apply the gloss effect using the Blending Options effect used for the previous spheres.

Step 69
Next is the bigger Blue sphere.

Now apply the gloss effect using the Blending Options effect used for the previous spheres.

Step 70
Lastly work on the Black sphere and start by adding the soft lights to it.

Now apply the gloss effect using the Blending Options effect used for the previous spheres.

Step 71
Using a Pen Tool you need to make a selection over the sphere like in the image below and simply mask the sphere out.

Step 72
Again using the Pen Tool you need to create a dark shape using the color #2a2914 and this shape will be the inside of the sphere.

Step 73
Create s circle inside the Black sphere and fill the circle with Yellow #ffe400.

Step 74
Add shadows and lights using the Brush Tool and Pen Tool to determine the light shapes.

Step 75
Using a darker brown color like the one visible on the sphere you need to give the sphere a bigger edge. This detail will start to bring the sphere a lot of details and it will look a lot better.

Step 76
Until now the portrait image has been invisible and you only worked on the vexel elements although you will start bringing the portrait to visibility. Set the portrait to Image > Adjustments > Shadows/Highlights and set it to Shadows 100% and Highlights to 0%. Than set the portrait to Fill 30%.

Step 77
You will notice that so far you have a lot of layers and this will make your PSD file work very hard. You can select some of the layers and convert them to Smart Object. This is off course you choice.

Step 78
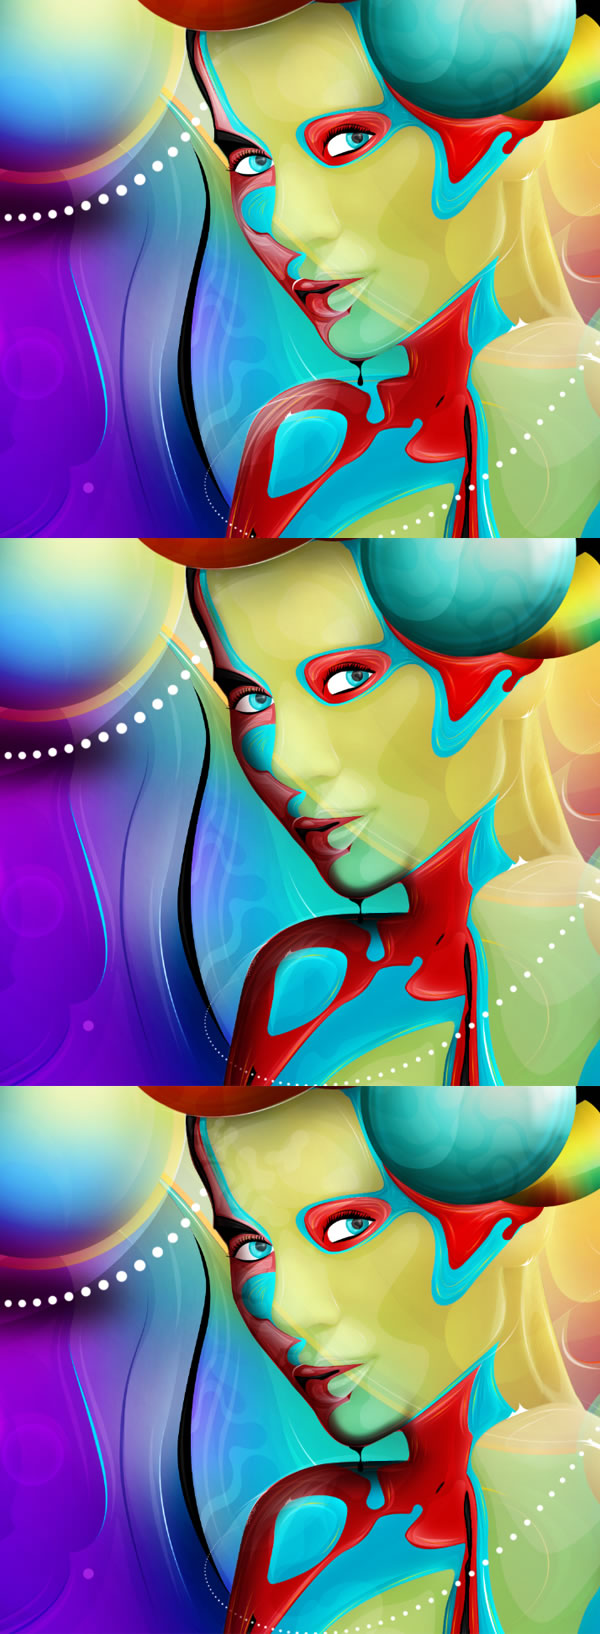
Most of the composition has been created and from here on out you will have to work hard on providing many details that will give your illustration a sleek look. The details will change the illustration a lot and you will notice this as you follow each step from here till the end of this tutorial.
First off add a dotted stroke around the girl simply by creating a path with the Pen Tool than feeling that path with the brush set to Hardness 100% and Spacing to 145% / 170%.

Step 79
Notice the 2 arrows in the image. They point you where the next change has been applied. Create a simple white shape over the Red sphere and than play with the opacity and also you can set it to Screen.

Step 80
Use the Pen Tool to create the next paths that you will fill with the white brush like below. Again follow the white arrows if you have trouble noticing the areas where the small brushes have been applied.

Step 81
Add a few sports of Yellow over the spheres like in the image than set them to a lower opacity.

Step 82
Continue to add a few more white shapes with low opacity over the composition.

Step 83
Now using the Ellipse Tool (U) you will create a few circles in different areas of the illustration than make the fill invisible but apply a Inner Glow using the Blending Options. For the Blending Options use #f48a10 set to Screen and 75% Opacity.

Step 84
Next you will create a few white spots of light around the illustration as seen in the image below than you will add a dark gradient on the left side of the illustration. You will not add this gradient over the right side as there we have our girl situated and we want to bring more attention to here by playing with the lights and shadows.


Step 85
Add a few more white strokes using the Pen Tool and the regular Brush set to white.

Step 86
Add a few white shapes set to lower opacity over the girls face. Follow the image below for the area where you need to place the new glow.

Step 87
On these next steps you will start adding more detail to the blue and red colors around the eyes of the girl. These strokes that you will add here will give the shapes some sort of meat/muscle texture.
Use the Pen Tool again than you will have to fill the strokes you create using the brush set to white or soft orange.

Once the Red side is done move closer to the eye to the Blue side. Also notice at the lower image a white shape has been applied over the strokes.

Continue on the closest Red area around the eye. Notice the arrows pointing to the orange/yellow strokes.

Lastly work on the left Blue and Red areas just as you did with the ones on the right.

Step 88
Before moving on to the lower part of the colored areas to add details you will need to add a few more soft white shapes over the strokes you just created to give it a gloss effect.

Step 89
Repeat the steps 87 to 88 and apply the same strokes and gloss over the lower areas.

Step 90
Using the Pen Tool again you will need to create more white strokes in different areas but please pay attention where you place these. They cannot be placed at random spots but instead you need to follow the stream of colors and apply these just as you would create a running river. Observe the before and after images below.


Step 91
Next you will be continuing to add more circles around the composition but this time setting the Blending Option like this: Outer Glow set to Screen, Opacity 75%, color #c400ff, Softer and Size to 32px. Also set the Inner Glow to Screen, Opacity 75%, color #c400ff, Softer and Size 51px.

Step 92
Next you need to add a bit of depth over the portrait of the girl as at the moment it looks a bit flat. Because the light is shining from above her head you will add the shadow over the left side of the face.
Use the black brush after you made a selection around the girl and add a layer that you will softly brush over to bring out the shadow. Also you will notice at the last image below that some white shapes like a water reflection has been created on the shadow side. Simply achieve this effect by using the Pen Tool and creating similar paths and filling them with white with a lower opacity.
Step 93
It is time to start adding some volume to the colored shapes around the composition. You will do this by either adding shadows, lights or even burning some areas of the shapes to bring out the color some more.

Make certain selections of the area you wish to edit and simply burn, dodge, add white layers and set them to Overlay, Screen, Soft Light. These are all different techniques you can use but it is up to you to experiment and place the effects you are most happy with.

Step 94
Continue working your magic through out all the areas.


Step 95
Stroke details will have to continue as you will experiment and keep adding these elements to fill up certain areas that seem to be missing detail.

Step 96
Add a few more details to the eyes and lips of the girl.

Step 97
In this step you will add a bit more depth to the composition by inserting a few more new spheres. These new spheres will have different blur effect applied to them so that they will give the impression that they are closer or further away from the subject.
Each sphere will be grouped each in a smart object layer. Follow the images below to understand the changes that each sphere ill take before being applied in the composition.

Step 98
Make sure you create 2 copies for each sphere. This is because one copy will have a lower level of the blur effect applied to it and the second one will have a larger level of blur applied to it. These 2 spheres will be placed in the same area, the one with a larger level of blur above the other one like in the images below. Also create these spheres using the same or less settings like the ones you created in the steps 22 to 36.

The amount of blur applied is up to you. Experiment with each sphere.


Step 99
It is time to work some more on the biggest sphere on top of the girls head. As you noticed at this point the sphere has a big hole in it although we want to make the effect more realistic by creating a few cracks and broken pieces floating.
Start by creating the cracks first. Use the Pen Tool or even simple the brush tool set to white and black. You will need a tablet here to create nice looking cracks.

Apply the Debris Brush using the same brown color the sphere has now.

Continue adding the cracks. Also notice that along the cracks there are lighter and darker shapes applied. You will have to apply these simply by creating either white or black shapes, set to Overlay and Multiply than lower Opacity accordingly. This will give a more realistic effect of the cracked sphere.

Step 100
Create the pieces that shatter from the sphere. Do this by creating a few shapes using the Pen Tool and fill the shapes with the same color as the sphere.

Step 101
Create a few white layers (gloss) and dark ones (shadows) than you will create the thickness of the broken shapes like in the image below.

Step 102
Add the details of the broken pieces by adding gloss over the edges of the thickness and above them.

Step 103
Add the reflections of the other spheres over this broken one. (Colors and shapes).

Step 104
A few more details and thickness effects are required on certain areas. Follow the images below for reference.


Step 105
In the end you will need to add a few color adjustments so that colors pop up more. First add a few gradient map adjustments. First one will be on the left side of the compositions. Add a dark gradient set to Overlay and fill 10%.

Step 106
Add a Photo Filter set to Orange and Density 25%.

Step 107
Next add a Vibrance layer set to Vibrance +63 and Saturation 0%. The Vibrance will be added all over the composition.

Step 108
Add 4 Color Balance settings each edited especially for each color.

Final
Lastly add a few Levels settings to darken the composition and you are done.


 Like 198K
Comments