
This is another high quality Photoshop tutorial that shows you how to create a really cool effect. The end product is an awesome dreamy vintage picture, using some simple, but effective, techniques in Photoshop.
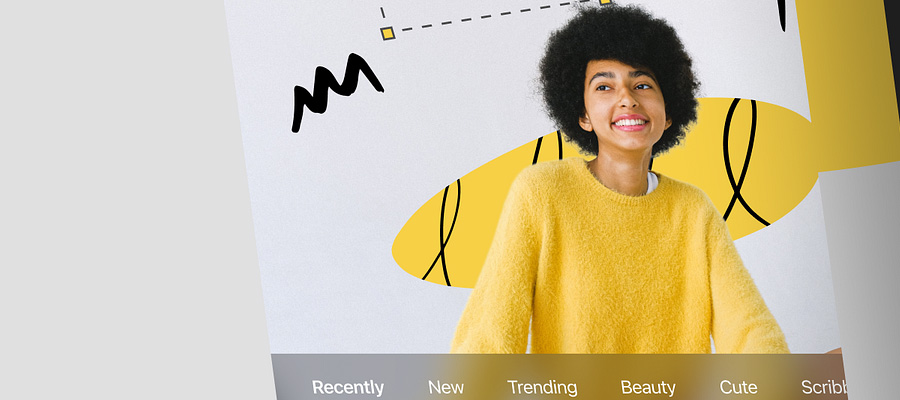
The final result of this tutorial:
The first you open the original picture below:
Press Ctrl + B (Color Balance) and set numbers as below:


Your picture will look like this:
Use Selective Color:


The result:
After that, you press Shift + Ctrl + N to make a new layer and fill the layer with the color: #14317A

Change blend mode to Exclusion, opacity: 50%
This is the result:
Use the gradient as below:

Change blend mode to Screen, opacity: 40%
Use Brightness/ Contrast

The result:
Take this texture and place it on top of your picture:
Blend mode: Lighten, opacity: 100%
Continue to put this texture:
Change blend mode to Screen, opacity: 100%
Now, take the other texture:
Blend mode: Screen, opacity: 100%
Put the last texture:
Mode: Lighten, opacity: 100%
Eraser some areas:
You use this text brush to decorate for the picture:
Press Shift + Ctrl + E to merge all layers then go to Filter > Sharpen > Sharpen
You will get the final result:


Breathtaking Dreamy Vintage Photoshop Tutorial


[...] View Tutorial [...]
[...] [...]
ooooohhhh simple image can look so awesome…some do some touches and editing and it will be a high quality and breathtaking cover.. COOL !!!! <3
[...] breathtaking-dreamy-vintage-photoshop-tutorial [...]
[...] Breathtaking Dreamy Vintage Photoshop Tutorial [...]
Didn’t go all the way but I love the faded vintage look. Awesome thanks!!!
How to download it?
Very nice, thank you! (:
[...] tutorial waarin stap voor stap wordt uitgelegd hoe je een ‘dromerig’ effect in je afbeelding [...]
This is awesome … i cant believe that….really..
Thank you! Great Tutorial!
Thank you so much!!
[...] Breathtaking Dreamy Vintage Photoshop Tutorial [...]
[...] Breathtaking Dreamy Vintage Photoshop Tutorial [...]
This didn’t work after the new layer part. I got to the part of changing the new layer to Exclusion and opacity to 50%, but after that it went downhill. Actually, it’s the gradient tool that tipped me off. :( Too bad.
Wow, amazing tutorial, super easy and great step by step instructions
Cool… love this tutorial
Looking for this, thanks a lot.
[...] 5. Breathtaking Dreamy Vintage Photoshop Tutorial [...]
[...] Breathtaking Dreamy Vintage Photoshop Tutorial [...]
THANKS I LOVE YOU.
My picture looks amazing :D thanks for the tutorial!
im not sure about After that, you press Shift + Ctrl + N to make a new layer and fill the layer with the color: #14317A
It seems that the image you use has to be small cuz when I put the textures in it and enlarge them you see big pixels.. and thats ugly? Or am I doing something wrong??
[...] Press Shift + Ctrl + E to merge all layers then go to Filter > Sharpen > Sharpen Breathtaking Dreamy Vintage Photoshop Tutorial – icanbeCreative [...]
Til the gradient step it was easy to follow. Then it was impossible.
wow dude wow. saw this tutorial and im going to check out the rest on this site.. im kind of curious how you came up with this tutorial, especially the color shifting in the beginning. plz feel free to email me! :)
[...] kam reikia, stengiuosi pasidalinti tuo, ką randu :) Gal ir niekam nereikia, bet dalinuosi – Fotopamoka, kaip padaryti Jūsų nuotrauką tokia svajokliškai vaikiška. Kaip kartais aš sakau – kaip [...]
this was EXACTLY what I was looking for, thank you so much!
Fabulous! Learned a ton!
I’m a bit stuck… I’m at the part where i add the gradient… Which layer do i add this to? The blue layer? Also, the brightness and contrast? I’m loving it so far, but just stuck at this one point! Thanks in advance
I use this on a photo from my wedding, and did a little bit different, but thank you so much!! You inspired me and helped me create a great image to remind me what I was feeling that day!
Those who are wondering where the Selective color can be found.It’s on the right side,sidebar in Photoshop CS5.I don’t know about older versions though.
For CS5 Extended;
http://27.media.tumblr.com/tumblr_lq6nd2qibR1qmg1jzo1_250.jpg
For Older Versions
http://www.lonestardigital.com/Lonestardigital/D_1/Color_Fix/color_fix_1.jpg
Ok, just fantastic, very helpful.
Brilliant tutorial, great explanations, perfect examples, and the fact you add the screens only to be pasted over the pictures enhances this material. Congratulations!
That’s a really great image. I might actually try this one out myself.
Thanks for sharing
I LOVE YOU ! Thanks SO much
ok maybe im just totally new to this but how do i get the textures u use in this turial cuz i really wanna try and use this. i love the end results?
[...] This “breathtaking, dreamy, vintage” tutorial seemed to fit the bill at first glance, but after reading through it, I found myself disappointed by its rigid structure. [...]
Who took the original photograph? Link?
do i have to download the texture? sorry I’m a beginner…
awesome!!!!
Wow terrific blog post! Impressive tutorial dude. It’s crazy how many exceptional tutorials you guys publish. Really like your site. Many thanks!
This is a very well written post! Keep them comming!
Awesome tutorial. I kind of got the effect, but I dont know where to find the “Selective Color” option. Sorry for being a noob, but could someone tell me where it is!?!?!?
[...] 40. Dreamy Vintage Effect [...]
[...] 40. Dreamy Vintage Effect [...]
[...] [...]
[...] continue with this week’s theme of dreamy images with bokeh, I wanted to share this great tutorial I found at Blueprint Media Design. While there technically isn’t any bokeh in this tutorial, I [...]
Download that photo (Right Click > Save As), next go to Photoshop, to “File” menu, and select “Place”, now just browse where you saved the image.
First of all, thanks so much for the trick. I have been looking to get this effect for a while now. I’m not good with photoshop at all, and I kinda got stuck in the texture part.. could you tell me pleas how to do it?
Thanks again for the whole thing and the answer in advance :)
[...] continue with this week’s theme of dreamy images with bokeh, I wanted to share this great tutorial I found at Blueprint Media Design. While there technically isn’t any bokeh in this tutorial, [...]
[...] Dreamy Vintage via Blueprint Media Design [...]
Thank you, its amazing!
this is absolutely stunning, great job !
[...] you want to try a soft and dreamy look then try this wonderful tutorial and look at the actions by CoffeeShop, e.g. “Soft Autumn Glow” or “Butterscotch [...]
[...] Dreamy Vintage via Blueprint Media Design [...]
Very cool! Keep em coming..
[...] Dreamy Vintage via Blueprint Media Design [...]
Awesome Tut!! Love the effect! Thanks for sharing you rock :-) I couldn’t get the text brush tho ….waaaa but I found some other brushes via that link…;-)
Terrific!
[...] Dreamy Vintage [...]
[...] Dreamy Vintage via Blueprint Media Design [...]
[...] Dreamy Vintage via Blueprint Media Design [...]
[...] 11.Breathtaking Dreamy Vintage Photoshop Tutorial [...]
[...] Dreamy Vintage via Blueprint Media Design [...]
cool !!
try yours:D
[...] Dreamy Vintage via Blueprint Media Design [...]
[...] Dreamy Vintage via Blueprint Media Design [...]
[...] Dreamy Vintage via Blueprint Media Design [...]
i don’t have a larger quality image for you to download, all you cand do is resize the image resolution (edit – free tranform), and apply the blending, it’s not so noticeable.
[...] Dreamy Vintage via Blueprint Media Design [...]
Is there a place where I can obtain a larger quality image for the texture backgrounds? I love this look! It is the best tutorial that I’ve found to obtian this look. Thanks so much!
[...] Dreamy Vintage via Blueprint Media Design [...]
[...] Dreamy Vintage via Blueprint Media Design [...]
[...] Dreamy Vintage via Blueprint Media Design [...]
[...] Dreamy Vintage via Blueprint Media Design [...]
[...] Dreamy Vintage via Blueprint Media Design [...]
[...] Туманный винтаж [...]
[...] Dreamy Vintage via Blueprint Media Design [...]
[...] Dreamy Vintage via Blueprint Media Design [...]
[...] Dreamy Vintage via Blueprint Media Design [...]
[...] Dreamy Vintage via Blueprint Media Design [...]
[...] Dreamy Vintage via Blueprint Media Design [...]
[...] Dreamy Vintage via Blueprint Media Design [...]
[...] Dreamy Vintage via Blueprint Media Design [...]
[...] Dreamy Vintage via Blueprint Media Design [...]
[...] post: Breathtaking Dreamy Vintage Photoshop Tutorial | Web Design Blog 2009 SHARETHIS.addEntry({ title: “Breathtaking Dreamy Vintage Photoshop Tutorial | Web Design Blog [...]
this really very helpful and explained in a very simple way
awesome..nice combination.
Very simple tutorial! Nice one mate :p
That looks so sick. You did a really great job. Good work.
Awesome and pretty complete tutorial, well done! Although not many “new” stuff is learned here, the combination of several awesome techniques like this makes the outcome absolutely stunning.
Keep up the great work!
Awesome effect! Keep it up :D
Awesome Tutorial, Really nice outcome ;)
Really funky design, given me tons of ideas for myself!
Really enjoyed this one, thanks!
amazing…it’s great tutorial
thanks!!!
Really Excellent work.!!!